Birds In Love Necklace Tutorial

2:22 PM Posted In , , , Edit This 0 Comments »
Check out this lovely vintage style pendant:
What's the Plan, Stan?
I used it to create this fantastic and beautiful necklace - and here's a tutorial to show you how to make it too!
Check out some of the other lovely Valentines Day beads and findings over at Artbeads.com

Ingredients:
  • 24 Dyed jade 6mm red rounds (I got these from Artbeads.com in their great beads for bloggers program, but they don't seem to be available any more)
  • 24 Brass eyepins
  • Brass chain
  • Brass birds pendant
  • Brass grape leaf drop
  • Brass lobster clasp

Tools Of The Trade:
  • Chain nose pliers
  • Wire Cutters
  • Round nose pliers

Process:
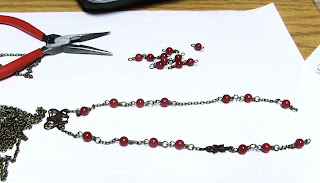
  • First, start by placing the 24 jade beads on eye pins. Finish with a wrapped loop.

  • Next, begin the actual necklace. For the first part, both halves will be the same:
    • 1 inch chain, 1 jade, 5 chain links, 1 jade, 1 chain link, 1 jade, 1 chain link, 1 jade

  • At this point, the sides are different.
    • Right Side: 2 chain links, grape leaf connector, 3 chain links
    • Left Side: 14 chain links ( you will want the left side to match the length of the new section on the right side - the number of links may not exactly match this tutorial, depending upon the size of the chain you are working with)
  • From here on, the sides are the same again: 1 jade, 1 chain, 1 jade, 1 inch chain, 1 jade, 4 chain links, 1 jade, 3 chain links, 1 jade, 2 chain links, 1 jade, 3 chain links, 1 jade, 4 chain links, 1 jade, 5 chain links. End with the clasp.

  • As a final touch, connect an extra length of chain, about 5 inches long to the link under the brass grape leaf connector, and the link above the corresponding jade link on the opposite side (the fourth jade link from the pendant)

C'est Fin!


Ohhhh Pssssst! Guess what? My earrings and necklace tutorials are featured in the Artbead facebook Valentine's Day Blogger Gallery of Designs
*I have received these products free of charge from Artbeads.com to honestly review in this blog. I have not been paid for my endorsement as it pertains to the products received*

Vintage inspired Brass and Glass Necklace Tutorial

12:17 PM Posted In , , , , , Edit This 3 Comments »
There are so many beautiful brass components and jewelry designs out there. I have been aching to play around with them, and I got the perfect opportunity with the Artbeads.com beads for bloggers program. Check out their fantastic Valentines Day Beads and Findings
What's The Plan, Stan?
I made a beautiful, asymmetrical necklace using some goodies from Artbeads.com and I'm going to share it with you! Try it out for yourself and let me know what you think!

Ingredients:


Tools Of The Trade:

  • Chain nose pliers

  • Round nose pliers

  • Wire Cutters

Process:


Step One: First, place all the roundells on the eyepins. Then, end them with a wrapped loop.

Step Two: Now that your beads are ready, start by creating the pendant. Attach two 6mm jumprings to the Vined Heart Link. Then, attach a 6mm jumpring to the bottom. To this jumpring, connect about 1 inch of chain. Connect the end loop of the chain to the base loop of a glass bead section.
Step Three: Now it's time to move on to the rest of the necklace. I'll give you the pattern for the entire right side, then the left. Remember, it's an asymmetrical necklace, so the sides aren't going to match :)
  • Connect one glass bead to the jumpring. Add a 6mm jumpring to the end, connected to 4 brass chain links, 1 6mm jumpring, 1brass chain link, 1 6mm jumpring
  • Add one glass bead, then 1 6mm jumpring to the end, 4 brass chain links, 1 6mm jumpring
  • Add one glass bead, 2 brass chain links
  • Add one glass bead, 2 brass chain links
  • Add one glass bead, about 1 1/8 inches of brass chain
  • Add one glass bead, about 3 1/4 inches of brass chain, 1 half of the flower clasp
Step Four: One half down, second half to go!
  • Connect about 1 inch of brass chain to the jumpring, add 1 6mm jumpring
  • Add a glass bead, 4 brass chain links
  • Add one glass bead, 1 brass chain link, 1 6mm jumpring, 2 brass chain links
  • Add one glass bead, 2 brass chain links
  • Add one glass bead, 2 brass chain links, 1 6mm jumpring, brass chain link
  • Add one glass bead, 3 brass chain links
  • Add one glass bead, 4 brass chain links, 1 6mm jumpring, 3 1/4 inches of brass chain, second half of the flower clasp

C'est Fin!
*I have recieved these products free of charge from Artbeads.com to honestly review in this blog. I have not been paid for my endorsement as it pertains to the products received*

Apple Blossom Necklace: Sneak Peek

6:40 PM Posted In , Edit This 0 Comments »
Apple Blossoms are the herald of spring - and even though it's snowing like crazy here in New Hampshire, this lovely necklace just reminds me that spring will be here soon enough.

Today I made this fantastic necklace, soon available for purchase in my Etsy shop. It matches my Copper Butterfly Earrings


Want to see the completed necklace?
C'est Fin!

Necklace and Earrings Tutorial Bali and Glass Beads

8:02 PM Posted In , , , , , Edit This 2 Comments »
I am in love with glass beads, especiall Czech glass. There are many ways to work with glass. Check out my African Inspired Necklace , also made with Czeck glass, but with a totally different look and feel than what you might typically expect working with these kinds of beads. Since I started making jewelry, I have admired Bali Silver beads, charms and findings.


What's The Plan, Stan?
I have created a nifty tutorial using products sent by Artbeads.com as part of their blogging program. Try it out for yourself :)


Ingredients:


Earrings:
  • 2 Sterling Silver Headpins
  • 2 Bali Bicone Beads with Wirework
  • 2 Czech Glass Opalite and Alexandrite Picasso Roundels
  • 2 seed beads
  • 2 Sterling silver seed beads

Tools Of The Trade:
  • Round Nose Pliers
  • Needle Nose Pliers
  • Wire Snips
  • Flocked Beading Board
Process:
  • Step One: Create the dangle pendant. Snip off the end of a headpin, leaving a 2" sterling silver wire. Create a wrapped loop on one end. Add a seed bead, then 1 Bali bicone, 1 seed bead. Finish with a wrapped loop. Use the 4mm jumpring to connect the segment to soldered end-ring of the Bali S Clasp.
    • First segment: seed bead, peacock freshwater pearl, lacy agate round. End with a wrapped loop, connecting to the end loop of the Bali segment.
    • Second segment: 2 seed beads, peacock freshwater pearl, lacy agate round. End with a wrapped loop, connecting to the top loop of the first segment.


    • Third segment: 3 seed beads, peacock freshwater pearl, lacy agate rounbd. End with a wrapped loop, connecting to the top loop of the second segment.

  • Step Two: Create the first strand. Start in the middle with 1 rice shaped freshwater pearl, then add 12 seed beads to either side. Add 1 lacy agate round to either side. 10 seed beads, 1 lacy agate, 10 seed beads.
    • Add 1 rice shaped freshwater pearl to either side. 10 seed beads, freshwater pearl, 10 seed beads. Add 1 glass roundel to either side. 10 seed beads, 1 freshwater pearl, 10 seed beads, 1 glass roundel, 10 seed beads, 1 roundel.
    • Add 8 seed beads, 1 freshwater pearl, 6 seed beads, 1 roundel, 4 seed beads, 1 crimp bead, 1 roundel

    • String the wire through the soldered jumpring of the clasp. Thread it back through the roundel and crimpbead. Crimp and trim. Do this to both ends. Be careful not to crush a seed bead or two while crimping.

  • Step Three: Create the second strand. Start with stringing 10 seed beads. Add a peacock freshwater pearl to either side, 3 seed beads, freshwater pearl, 10 seed beads.
    • Add a freshwater pearl to either side, 3 seed beads, freshwater pearl, 10 seed beads.
    • Add a glass oval to either side, 10 seed beads, freshwater pearl, 3 seed beads, freshwater pearl, 10 seed beads.

    • Add a glass oval to either side, 10 seed beads, 1 lacy agate round, 10 seed beads, 1 lacy agate round, 3 seed beads, 1 crimp bead.
    • Sting the wire through the soldered endrings of the clasp and crimp. Unhook the clasp and hold out the second strand, using the end you have not yet attached to the clasp. Wrap the first strand around the second strand as tightly as you can, until both ends are the same length. Loop the wire through the endring of the clasp and crimp.
  • Step Four: Make the earrings. Place a Bali bicone, glass roundell and glass seed bead on each sterling headpin. End with a wrapped loop. Connect to sterling silver earwires.


C'est Fin!

*I have recieved these products free of charge from Artbeads.com to honestly review in this blog. I have not been paid for my endorsement as it pertains to the products received*

Etsy Shop Sneak Peak

2:02 PM Posted In , , Edit This 0 Comments »
I've been working away like crazy creating jewelry for my Etsy shop and it's been great! I snapped some pictures while I was at it to give you guys a sneak peak of what's to come and some glimpses at the work behind the scenes.


(A view from my window at 7:30 AM this morning)


Sneak Peak : Amber Sunrise Necklace


Etsy Bonanza!

10:20 AM Posted In , , , , , Edit This 0 Comments »


These past two weeks have been crazy busy for me, but I'm finally sculpting out some time for updating my Etsy shop. Here are some of my new treasures, available for purchase on Etsy.


Callie's Creations : New Etsy Items

5:09 PM Posted In , , , Edit This 0 Comments »
On October first, I re-opened my jewelry shop on Etsy: Callie's Creations! Of course, my computer promptly crashed right after. I am back home this weekend, getting caught up on all things jewelry. Here are some neat and beautiful things you can find in my Etsy shop. Take a look around and let me know what you think!

African Inspired Necklace


Computer Girl Necklace


Autumn Necklace


Maple Leaves Dangle Earrings


Upcycled Pink Computer Fuse Earrings


Purple Days