Birds In Love Necklace Tutorial

2:22 PM Posted In , , , Edit This 0 Comments »
Check out this lovely vintage style pendant:
What's the Plan, Stan?
I used it to create this fantastic and beautiful necklace - and here's a tutorial to show you how to make it too!
Check out some of the other lovely Valentines Day beads and findings over at Artbeads.com

Ingredients:
  • 24 Dyed jade 6mm red rounds (I got these from Artbeads.com in their great beads for bloggers program, but they don't seem to be available any more)
  • 24 Brass eyepins
  • Brass chain
  • Brass birds pendant
  • Brass grape leaf drop
  • Brass lobster clasp

Tools Of The Trade:
  • Chain nose pliers
  • Wire Cutters
  • Round nose pliers

Process:
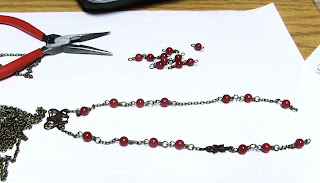
  • First, start by placing the 24 jade beads on eye pins. Finish with a wrapped loop.

  • Next, begin the actual necklace. For the first part, both halves will be the same:
    • 1 inch chain, 1 jade, 5 chain links, 1 jade, 1 chain link, 1 jade, 1 chain link, 1 jade

  • At this point, the sides are different.
    • Right Side: 2 chain links, grape leaf connector, 3 chain links
    • Left Side: 14 chain links ( you will want the left side to match the length of the new section on the right side - the number of links may not exactly match this tutorial, depending upon the size of the chain you are working with)
  • From here on, the sides are the same again: 1 jade, 1 chain, 1 jade, 1 inch chain, 1 jade, 4 chain links, 1 jade, 3 chain links, 1 jade, 2 chain links, 1 jade, 3 chain links, 1 jade, 4 chain links, 1 jade, 5 chain links. End with the clasp.

  • As a final touch, connect an extra length of chain, about 5 inches long to the link under the brass grape leaf connector, and the link above the corresponding jade link on the opposite side (the fourth jade link from the pendant)

C'est Fin!


Ohhhh Pssssst! Guess what? My earrings and necklace tutorials are featured in the Artbead facebook Valentine's Day Blogger Gallery of Designs
*I have received these products free of charge from Artbeads.com to honestly review in this blog. I have not been paid for my endorsement as it pertains to the products received*

Vintage inspired Brass and Glass Necklace Tutorial

12:17 PM Posted In , , , , , Edit This 3 Comments »
There are so many beautiful brass components and jewelry designs out there. I have been aching to play around with them, and I got the perfect opportunity with the Artbeads.com beads for bloggers program. Check out their fantastic Valentines Day Beads and Findings
What's The Plan, Stan?
I made a beautiful, asymmetrical necklace using some goodies from Artbeads.com and I'm going to share it with you! Try it out for yourself and let me know what you think!

Ingredients:


Tools Of The Trade:

  • Chain nose pliers

  • Round nose pliers

  • Wire Cutters

Process:


Step One: First, place all the roundells on the eyepins. Then, end them with a wrapped loop.

Step Two: Now that your beads are ready, start by creating the pendant. Attach two 6mm jumprings to the Vined Heart Link. Then, attach a 6mm jumpring to the bottom. To this jumpring, connect about 1 inch of chain. Connect the end loop of the chain to the base loop of a glass bead section.
Step Three: Now it's time to move on to the rest of the necklace. I'll give you the pattern for the entire right side, then the left. Remember, it's an asymmetrical necklace, so the sides aren't going to match :)
  • Connect one glass bead to the jumpring. Add a 6mm jumpring to the end, connected to 4 brass chain links, 1 6mm jumpring, 1brass chain link, 1 6mm jumpring
  • Add one glass bead, then 1 6mm jumpring to the end, 4 brass chain links, 1 6mm jumpring
  • Add one glass bead, 2 brass chain links
  • Add one glass bead, 2 brass chain links
  • Add one glass bead, about 1 1/8 inches of brass chain
  • Add one glass bead, about 3 1/4 inches of brass chain, 1 half of the flower clasp
Step Four: One half down, second half to go!
  • Connect about 1 inch of brass chain to the jumpring, add 1 6mm jumpring
  • Add a glass bead, 4 brass chain links
  • Add one glass bead, 1 brass chain link, 1 6mm jumpring, 2 brass chain links
  • Add one glass bead, 2 brass chain links
  • Add one glass bead, 2 brass chain links, 1 6mm jumpring, brass chain link
  • Add one glass bead, 3 brass chain links
  • Add one glass bead, 4 brass chain links, 1 6mm jumpring, 3 1/4 inches of brass chain, second half of the flower clasp

C'est Fin!
*I have recieved these products free of charge from Artbeads.com to honestly review in this blog. I have not been paid for my endorsement as it pertains to the products received*

Copper Swarovski Earring Tutorial

10:16 AM Posted In , , , , , Edit This 1 Comment »
Remember this sneak peak?


What's The Plan, Stan?
I'm so excited to share this tutorial with you, using some great Valentines Day Beads and Components from Artbeads.com. I love these earrings, and I know you will to.

Ingredients:

Tools Of The Trade:
  • Wire cutters
  • Chain nose pliers
  • Round nose pliers

Process:
  • First, place your swarovski crystals on the headpins. Finish with a wrapped loop.
  • Next, open your jumpring, and add one swarovski crystal loop to each jumpring.
  • Place the copper key charms on each jumpring, on either side. 
  • Add the earwires.


C'est Fin!

*I have recieved these products free of charge from Artbeads.com to honestly review in this blog. I have not been paid for my endorsement as it pertains to the products received*

Feminine Hair Clips: Tutorial

12:53 PM Posted In , , , , Edit This 1 Comment »
Happy Tuesday Readers!
Check out this great Etsy treasury made by Dirt Road Artists team member, AzJude (See my Eeps Bird Earrings?)


The past few days I have been admiring all the fun and feminine flower hair clips out there, and I wanted one of my own. However, as most college students can attest to, when textbooks must be purchased, money is ... essentially non-existent. So, I decided to make my own!


What's The Plan, Stan?
Catch a sneak peak at my process and make some beautiful flower clips of your own

Ingredients:
  • Silk or other fabric flowers
  • Metal hair clips or barretts
  • Embellishments:
    • Feathers
    • Sparkles
    • Glass Gems etc
  • Glue: I used E-6000, but I'm sure that a hot glue gun would do the trick
Tools Of The Trade:
  • Patience
Process:
  • First, select your flower. Silk/fabric flowers are made up of layers of petals held together with a plastic stamen (that would be the white plastic bit in the center of the flower below). Remove the stamen and take the layers apart.


  • Next, glue the layers back together, minus the stamen. You will want to create a flat base so you can easily glue the flower onto the barrett.


  • Next, glue on a button or other embellishment to cover the hole where the stamen was. In this pictures, I just used a cute white button


  • Now, glue the base of the flower onto the barrett- I strongly suggest using E-6000 or some other epoxy for this to make sure the flower is secure.


  • Voila!


Check out this barrette I made with flowers and feathers:


C'est Fin!

Fun Valentines Day Gift Wrap

1:24 PM Posted In , , , , Edit This 1 Comment »
This Valentines Day, you don't have to run out and buy heart-covered wrapping paper. You probably already have the supplies to make your own unique and recycled gift wrap.


What's The Plan, Stan?
I made this wrapping paper that works for Valentines Day but doesn't really scream Cupid.

Ingredients:
  • Rubber Stamp (I used a really fun Owl stamp I got from the dollar bin at Michaels a few months ago)
  • Ink Pad (you can use all kinds of colors - I just used black ink)
  • Tissue Paper, Craft Paper, Old Wrapping paper (shhh it's a secret, but I just used the tissue paper from a giftbag I'd gotten a while ago)

Tools Of The Trade:
  • Creativity
  • Hands

Process:
  • Ink up your stamp


  • Plot your image around the paper - spreading it out. I found I could get three ok stamps with one go before having to re-ink. The first stamp will be darkest, then lighter etc.


  • Work your way around until the entire page is covered


This also works well as a background for your jewelry photographs: This is my Hearts of Porcelain Valentines Day set


I also want to share with you this really great tutorial on make your own eco-friendly, recycled shipping boxes. My mind is spinning with ideas! Check Out: Picnic Basket Crafts

C'est Fin!

Chinese Dangle Earrings Tutorial

5:10 PM Posted In , , , Edit This 0 Comments »
These fun Chinese inspired earrings are a gift for my friend Kali's 25th birthday! I first met Kali when I was working at Hallmark, and we've been good friends since then. I really hope she likes the earrings!


What's The Plan, Stan?
  • I'm giving you these earrings too! Just follow my step-by-step tutorial and you can make them for yourself.

Ingredients:
  • Two antiqued brass Chinese coin stampings
  • Two Chinese character antiqued brass findings
    • This is the closest I could find to the talisman I actually used for these earrings... Firemountaingems.com does not seem to carry the orriginal anymore :(
  • Two gold plated earwires
  • Two 6mm pale green glass beads
  • Two gold plated fluted bicone beads
  • Two small wooden beads
  • Gold plated 22 ga wire
  • 6 8mm gold plated jumprings
  • 4 4mm gold plated jumprings

Tools Of The Trade:
  • Chainnose pliers
  • Roundnose pliers

Process:
  • Create a wrapped loop using gold plated wire through two of the brass coins.
  • Connect two 8mm gold plated jumprings to the earwires.
  • Using another 8mm jumpring, connect the large coin charm to the 2nd of the jumprings
  • Using a 4mm gold plated jumpring, connect the talisman charm to the 2nd 8mm jumpring.
  • Create a dangle: place the green glass bead, then the gold plated bicone on a headpin. End it with a wrapped loop.
  • Using a 4mm gold plated jumpring, connect the wrapped loop of the dangle to the 1st 8mm jumpring.

C'est Fin!


Bead Artist Showcase
You work could be right here! Submit your own earring ideas to Creativity In A Nutshell via email to cagarp@plymouth.edu. Feel free to include pictures, anything new you tried and suggestions you have for improvement.

More Similar Fun Stuff!

Necklace and Earrings Tutorial Bali and Glass Beads

8:02 PM Posted In , , , , , Edit This 2 Comments »
I am in love with glass beads, especiall Czech glass. There are many ways to work with glass. Check out my African Inspired Necklace , also made with Czeck glass, but with a totally different look and feel than what you might typically expect working with these kinds of beads. Since I started making jewelry, I have admired Bali Silver beads, charms and findings.


What's The Plan, Stan?
I have created a nifty tutorial using products sent by Artbeads.com as part of their blogging program. Try it out for yourself :)


Ingredients:


Earrings:
  • 2 Sterling Silver Headpins
  • 2 Bali Bicone Beads with Wirework
  • 2 Czech Glass Opalite and Alexandrite Picasso Roundels
  • 2 seed beads
  • 2 Sterling silver seed beads

Tools Of The Trade:
  • Round Nose Pliers
  • Needle Nose Pliers
  • Wire Snips
  • Flocked Beading Board
Process:
  • Step One: Create the dangle pendant. Snip off the end of a headpin, leaving a 2" sterling silver wire. Create a wrapped loop on one end. Add a seed bead, then 1 Bali bicone, 1 seed bead. Finish with a wrapped loop. Use the 4mm jumpring to connect the segment to soldered end-ring of the Bali S Clasp.
    • First segment: seed bead, peacock freshwater pearl, lacy agate round. End with a wrapped loop, connecting to the end loop of the Bali segment.
    • Second segment: 2 seed beads, peacock freshwater pearl, lacy agate round. End with a wrapped loop, connecting to the top loop of the first segment.


    • Third segment: 3 seed beads, peacock freshwater pearl, lacy agate rounbd. End with a wrapped loop, connecting to the top loop of the second segment.

  • Step Two: Create the first strand. Start in the middle with 1 rice shaped freshwater pearl, then add 12 seed beads to either side. Add 1 lacy agate round to either side. 10 seed beads, 1 lacy agate, 10 seed beads.
    • Add 1 rice shaped freshwater pearl to either side. 10 seed beads, freshwater pearl, 10 seed beads. Add 1 glass roundel to either side. 10 seed beads, 1 freshwater pearl, 10 seed beads, 1 glass roundel, 10 seed beads, 1 roundel.
    • Add 8 seed beads, 1 freshwater pearl, 6 seed beads, 1 roundel, 4 seed beads, 1 crimp bead, 1 roundel

    • String the wire through the soldered jumpring of the clasp. Thread it back through the roundel and crimpbead. Crimp and trim. Do this to both ends. Be careful not to crush a seed bead or two while crimping.

  • Step Three: Create the second strand. Start with stringing 10 seed beads. Add a peacock freshwater pearl to either side, 3 seed beads, freshwater pearl, 10 seed beads.
    • Add a freshwater pearl to either side, 3 seed beads, freshwater pearl, 10 seed beads.
    • Add a glass oval to either side, 10 seed beads, freshwater pearl, 3 seed beads, freshwater pearl, 10 seed beads.

    • Add a glass oval to either side, 10 seed beads, 1 lacy agate round, 10 seed beads, 1 lacy agate round, 3 seed beads, 1 crimp bead.
    • Sting the wire through the soldered endrings of the clasp and crimp. Unhook the clasp and hold out the second strand, using the end you have not yet attached to the clasp. Wrap the first strand around the second strand as tightly as you can, until both ends are the same length. Loop the wire through the endring of the clasp and crimp.
  • Step Four: Make the earrings. Place a Bali bicone, glass roundell and glass seed bead on each sterling headpin. End with a wrapped loop. Connect to sterling silver earwires.


C'est Fin!

*I have recieved these products free of charge from Artbeads.com to honestly review in this blog. I have not been paid for my endorsement as it pertains to the products received*