2:10 PM
Posted In
feathers
,
project
,
technique
,
tutorial giveaway
Edit This
Today is Fantastical Friday - At Last!!!
I have wanted to play around with making feather earrings for AGES, but I haven't really had the time. No, correction, I haven't really MADE the time :) So yesterday afternoon, between pouring over the nifty
Valentines Day beads at Artbeads.com, taking some more great pictures, listing
these cute earrings
I dug out some feathers I had in my crafting stash, and following
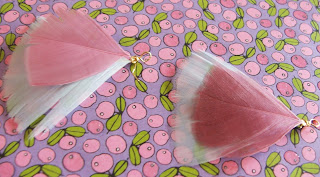
this great tutorial, I made some feather earrings of my own!
What's The Plan, Stan?
- You really should check out this tutorial for detailed directions, but check out pictures from my process below!
Ingredients:
- Feathers
- I used feathers from a large bag of crafting feathers I bought well over a year ago. Check out your local craft store for more natural looking feathers. Many Etsy sellers also sell beautiful feathers for crafting with - check out
- Headpins
- Crimp Beads
- Jumprings
- Earwires
Tools Of The Trade:
- Wire cutters
- Round nose pliers
- Chainose pliers
Process:
C'est Fin!
Ooooo Also: Check out this great giveaway over at
Wire Bliss Mei
She makes fun wire tutorials and she's giving one away to THREE readers! Good luck!
1:34 PM
Posted In
Etsy
,
jewelry
,
photography
,
resources
,
technique
Edit This
Ok, so you've taken some great shots of your jewelry using some of the tips I mentioned in my earlier blog post,
Photographing Your Jewelry but even the best pictures can use some extra help with photo editing software.
First of all, I would advise against any computer editing that makes your jewelry look different than it actually is. Don't alter the color any more than necessary to make the photograph accurate to life. Remember that your photographs will look different on a different computer, particular if your computer is a mac and the photo is viewed on a pc.
That being said, there are some basic corrections you can make to your photographs to make them look better and more professional, without giving your viewers a false sense of what your work is like. My editing process generally uses two programs and goes in three steps.
Step One: I upload all of my photographs (I like to photograph my jewelry in one lump to get it all done at once) and organize them into folders. Once this is done I do an innitial swipe to delete all of the blurry pictures, poorly composed or poorly lit pictures. As you become more comfortable and familiar with taking pictures of your jewelry there should be fewer of the these.
Step Two: I open the remaining pictures in Window Life Photo Gallery - formerly Windows Photo Editor. It's a nifty program with a lot of new accessories since it came out with Windows Vista. If you have Windows 7, this program will not have come automatically with your computer, however, you can download it for free at via Windows Live. It's seriously worth it. I do my basic editing - adjust lighting, heighten contrast, and cropping. At this stage I'm mostly concerned with composition and cutting down my photos. You don't need a million pictures of one pair of earrings. Be really selective and chose your best 5 or 6.
Step Three: Once I've narrowed it down to 5 or 6 photos, I edit them in
GIMP. I like to refer to GIMP as Photoshop on steroids. It's completely free and easy to use. I use GIMP to fine tune the pictures, check color accuracy and tweaking brightness/contrast until I am 100% satisfied. Then I just re-name the pictures to match the piece of jewelry and tada! I'm done!
1:21 PM
Posted In
Etsy
,
jewelry
,
photography
,
technique
Edit This
Today it is snowing. Again. And since I've been house-bound for the past couple of days I've been powering through my massive to-do list. What's on today's agenda? Photographing all the jewelry I've made but haven't listed on Etsy. Chances are, if you're making your own jewelry, you're going to want to take pictures of it, to blog about, to sell online, or just to commemorate some kick-ass work.Taking good pictures of your jewelry isn't easy, so I figured today's blog would be all about tips and tools for taking some fantabulous pictures.
Tools of the Trade:
- Ultimately, your pictures are only going to be as good as the equipment you're using will allow. The higher your resolution and the greater your ability to manually focus your camera, the better your pictures are going to be. No matter what kind of camera you are working with, I strongly suggesting investing in a tripod. Sadly, I have left mine at my dorm room, so I'll be working solo for this photo session.
- If you have a good camera, it should have a macro setting. This will pre-set the camera to focus very close up - perfect for photographing jewelry.
- Tip Number One: Try making your own lightbox. A basic way to photograph your jewelry is on a black or white background. The challenge then becomes getting good light. You don't want dark shadows and you don't want to bleach out your beautiful piece. Try taking a shallow cardboard box, lining it with white paper or fabric and using one or two desk lamps to create the perfect mini photostudio for photographing your jewelry. Check out this blog for an interesting example.
- Tip Number Two: The background you chose to display your jewelry on is going to impact the way your jewelry looks to the viewer. So, you should consider this choice carefully. Do you want it to contrast or compliment? Should it follow a theme of your piece, or simply work as a backdrop? These are all choices you should consider every time you take a picture of your work. There are lots of ways to create backdrops for your work. Here are a few suggestions:
- Fabric is also an excellent choice for any backdrop. I have a bunch of fabric around anyways, but it's not a bad idea to get a supply going. Peruse sale fabric as JoAnn's or even the $1 yards at walmart. Start out with the basics- black and white, then add some cool stuff. It doesn't take much fabric to make a background. A fat quarter would suffice, but a yard or two certainly gives you more room to play with. Be creative with fabric. You might have a great pattern on a dress that you could snag for a few seconds to become the new backdrop for your jewelry photos.
- Tip Number Three: You can also use accessories to show off your jewelry. These can range from your typcial bust, to carefully placed stones. Whatever accessories you use should reflect the image you're trying to create around this particular piece.
Tips for Photographing Earrings:
Although it can be easier to photograph a pair of earrings on a flat surface, people are going to want to see what the earrings look like when they're dangling as they would when you're wearing them. If you're going to keep them, then it's ok if you do just that - take a picture of you or someone else wearing them. However, if you're selling your earrings DO NOT wear them! It's not hygenic or professional.

Try hanging your earrings from a branch, an earring tree, a pretty glass bowl, a ribbon, a metal container... There are lots of funky things out there you can hang your earrings from that will make them look neat, but still totally hygenic :)
C'est Fin!
9:17 PM
Posted In
bead making
,
diamond glaze
,
painting
,
scrabble tiles
,
technique
,
tutorial
,
upcycling
,
watercolor
Edit This
There's a lot of beautiful jewelry out there. I can get caught up on
Etsy for hours and hours, just engrossed in all the wonderful ways people create jewelry. It truly is an art. That word right there, art, is the key to what I aspire to with my jewelry. I believe any necklace, earrings, ring, bracelet should be a unique and inspiring work of art.
One way to reach that goal, is to create interesting and innovative designs. Another way, however, is to create my own little art beads and charms. I have been working towards that with my scrabble tile charms and pendants. My next new idea is to create miniature watercolor paintings, which I will epoxy onto a shape and create a miniature mounted painting, which can strung on a necklace, or dangled from an earrings.
I am just in the beginning stages of this technique, but I am so excited about it, I just had to share the idea! I have a great deal of experience with watercolor painting. To see a collective gallery of my watercolor works, skip over to my art
website.
On a side note, I will also be testing out Diamond Glaze for this tutorial. Since this is my first time using it, I have come up with a lot of problems and am searching for solutions. Stay posted to learn more about my adventures with Diamond Glaze!
What's The Plan, Stan?
- I'm going to walk you through my initial process of creating these fun, original works of art, with additional information on paint and paper.
Ingredients:
- First of all, you will need watercolor paper
- A note about paper: you will quickly notice that realm of artist watercolor paper is vast, and rightfully so. Different kinds and qualities of papers will have different affects. Here are the basics:
- Cold press paper will have a more rough, more visible texture to it. This can be good or bad, depending on what you want.
- Hot press paper is the opposite, which a much smooth surface, and minimal visible texture.
- To begin with, student grade is fine, at least until you know if you like this idea or not.
- You will also, of course, need watercolor paints
- A note about paints: while I would not suggest buying a crayola watercolor paint pallet you should not spend a gazillion dollars on the firt project. Try a cheap boxed tube set for $6-$7 at Michaels
- For this adventure, we are going to work with two scrabble tiles to mount our pictures on. A - because we are (hopefully) already familiar with them, and we already have some (again, hopefully)
- If you have something else you can mount your paintings onto, by all means, try it out, and feel free to let me know how it went via cagarp@plymouth.edu
- Epoxy - there are tons out there but E9000 is a good one
- Mounting bail
- Diamond glaze, or similar
- Modge Podge to seal the painting
Tools Of The Trade:
- Fine round point watercolor brushes - synthetic work just fine
- Scissors
- Ruler
- Masking tape
- Watercolor pallet (you can get one for $.99)
- Art cloth - any clean old rag will do
- Mechanical pencil
Process:
- Carefully trace the scrabble tile on the watercolor paper, using a mechanical pencil. Make sure the lead is pressed right up against the tile.
- Next, keeping an extra boarder of about 1/2 inch, cut out the square.
- Tape down the paper, lining up the edge of the masking tape with the edge of the traced scrabble tile. Watercolor paper gets distorted as the fibers expand and soak up the pigment, but if taped down, it will shrink back to its normal shape.
- Paint your design/picture using whatever variety of watercolor techniques you know. Allow to dry completely. Remove the tape gently, so not to rip.
- Trim off the extra border around the painting.
- At this point, you may want to prep the scrabble tile. You could paint it, stamp it, do anything at all. Be creative! You may want to seal the scrabble tile with a coat of Modge Podge or lightly watered down craft glue.
- Attach the painting to scrabble tile using Modge Podge, or basic crafting glue.
- Turn the scrabble tile face down and trim off the extra paper.
- Seal top of painting with a coat of Modge Podge.
- Don't use watered down glue, as the water will cause the painting to smear.
- Epoxy the bail to back of the scrabble tile.
- Coat one side at a time with Diamond Glaze or Glossy Accents and allow to dry completely.
C'est Fin!
Bead Artist Showcase
Your work could be right here! Submit your own artwork beads to Creativity In A Nutshell via email to cagarp@plymouth.edu. Feel free to include pictures, anything new you tried and suggestions you have for improvement.
More Similar Fun Stuff!
Project: Scrabble Tile Jewelry
Tutorial: Scrabble Tile Pendants and Charms
3:22 PM
Posted In
bead making
,
crafting
,
embossing powder
,
Pearl Ex Pigments
,
stamps
,
technique
Edit This
While you may think embossing is for cardmaking and scrapbooking, it is actually a powerful tool to add to your bead making repertoire.
What's The Plan, Stan?
We're going to go over the basic technique of heat embossing. Try out your skills on one of the many projects and tutorials listed below. Come up with anything fantastic? Share it!
cagarp@plymouth.edu
Ingredients:
- Embossing powder (I suggest using clear, but there are a wide variety of colors available out there)
- Pearl Ex Pigments (optional)
- Ink (there are literally tons of kinds of inks out there. I recommend using Stayz On)
- Stamps (these can cost you lots and lots of money. I search through the $1 bins at Michaels, Dollar Stores and I make my own)
- Object to emboss on (such as a pre-drilled scrabble tile, or domino)
Tools Of The Trade:
- Heatgun (there are some good and some not so good heatguns out there. Having only worked with one, I'm not in a position to recommend a specific one. Check out different websites and read the reviews)
Process:
- Clean the surface of the object you are going to emboss on. (EX: if you're making a domino pendant, wipe it down with rubbing alcohol)
- Ink your chosen stamp (don't use too much ink, especially on a non-porous object. Try blotting your stamp on a tissue etc before stamping it.)
- Stamp your image! Lay the stamp down on a table and press the object on top of the stamp, rather than the other way around. This way the image will be placed exactly where you want it.
- Sprinkle with embossing powder over a piece of scrap paper. Tap your object to get off extra powder, and sift back into container.
- Heat the ink/embossing powder - - don't hold the heatgun too close so it doesn't actually burn it :) You'll see powder transform into bubbles and voila!
A note about Inks:
- Many of the projects bead artists will create use non-porous objects, such as dominoes, glass slides, etc. Regular dye-based inks, while still great on porous objects like scrabble tiles, won't stick on these surfaces. Also, if you intend to use alcohol inks with a stamped image, the alcohol will bread down dye-based inks and ruin your image. Remember these simple rules:
- If you're working on a porous surface, and not using alcohol inks - use regular ink.
- If you're working on a porous surface, and using alcohol inks - use "Stayz On" or "Metallic Inks"
- If you're working on a porous surface using alcohol inks and you want to create a resist image, use regular ink.
- If you're working on a nonporous surface, alcohol inks or not, use "Stayz On" or "Metallic Inks"
A note about Colored Embossing Powder:
- As I mentioned above, there are tons of beautiful colored embossing powders out there. However, why spend the extra cash (which many of us are so short on!) when you can make your own?
- Mix a small amount of Pearl Ex Pigment into your embossing powder and you have created your own unique color :)
C'est Fin!
Bead Artist Showcase
Have you made something beautiful using an embossing technique? Your work could be right here! Submit your stuff to Creativity In A Nutshell via email to cagarp@plymouth.edu. Feel free to include pictures, anything new you tried and suggestions you have for improvement.
More Similar Fun Stuff!
Go Buy Some!
Embossing Powder
Addicted to Rubber Stamps
6:22 PM
Posted In
crafting
,
flowers
,
technique
Edit This
The best part of making your own beads is being able to used recycled and found objects - including stuff you find in your own backyard. You can, of course, take this practice to what I consider the
ultimate maximum. However, you can also just stick with drying leaves and flowers. I chose to do the latter of the two, since bugs kind of freak me out, and I really don't want to kill a spider just so I can make a necklace.
Anyways, here are some quick steps to making your own dried/pressed flowers, rather than spending the big bucks in the scrapbook aisle.
Stay tuned for a great project using these pressed flowers :)
Ingredients
- Either a flower press (I used to have one made of two pieces of wood and four bolts) Or a big book
- Wax Paper (if you're using a book)
- Flowers
- Scissors
Procedure
- First go out and collect your flowers. As you experiment with drying your own flowers, you will notice that some will retain their color better than others. I am sure there is some scientific reason for this... .... which I couldn't tell you :)
- Next, cut off each flowers, leaving as little step as possible, while allowing the flower to remain intact.
- Place the flowers onto a strip of wax paper, and fold into a little packet
- Stick the packet into a book - feel free to fill up the book with as many of these packets as you want. Leave the book in a dry place for a couple weeks. Voila! You will then have fantastic pressed flowers for your beading delight - all your own!
Additional Information:
http://www.preservedgardens.com/how-to-press.htm
http://www.monkeysee.com/play/14402-how-to-press-flowers
10:35 PM
Posted In
ice resin
,
icecube trays
,
jewelry
,
Pearl Ex Pigments
,
resin
,
resin casting
,
technique
Edit This
Resin beads and pendants are totally customizable and unique. The possibilities are really endless. You can play around with shape, with color, texture, size, design, embellishments and inclusions. It is virtually impossible to make two resin pendants alike.
To begin with, you need to choose what resin you want to work iwht. I anticipated numerous options, but as it turned out, my local Micahels didn't even sell resin and there are only a few jewelry supply sites that do. I have discovered these brands:
Ice Resin – a two part kit containing the resin and a hardener (think of this as like the developer in a hairdye kit – it's what makes it work)
Easy Cast – another 2 part kit
Resin De Solei – has aspecial compound that reacts with sunlight or ultraviolet light to cure more quickly
There's another resin out there (the brand escapes me) which you must purchase a separate catalyst for (kind of like the hardener in the Easy Cast and Ice Resin kits) I didn't want to fuss with the specific measurements.
I settled with an Ice Resin kit (with measuring cuts, stirrers etc from fusionbeads.com (Free shipping!)
The next step is to figure out what you're going to pour the resin into. You have two basic options: you can pour it into a mold (or some object that will act like a mold), or you can pour it into an object, which will become part of the pendant.
Molds: You already know I'm all into recycling, so, while you can purchase some great resin molds, or candy molds, you can also use some great every-day stuff to make your own molds. Hey, it's not only Green :) but FREE! Got a box of chocolates? Great! Use the tray to create fun small bead molds. Ate with some plastic spoons? - that's ok – wash and reuse them as molds. Once you start looking for objects, you'll find them everywhere.
An important note.... just like when baking, you're not going to get those chocolate-chip cookies off the sheet if you didn't grease it! Remember to spray the molds with either a release spray or cooking spray (I have ready that cooking spray works just as well, and is a whole lot cheaper).
Permanent Holders: These are the kinds of resin pendants most of us are used to seeing. They're often pretty shallow indentations, perfect for paper media embellishments.
Collage Frames: are fun and easy with a loop already on the top for stringing. All you have to do is add your fun stuff and pour the resin. The down side is (for me anyways) they're kind of pricey, at around $5 a pop. I found some plated ones at fusionbeads.com that were a bit more reasonable.
Bottle Capes: are recycled, generally deeper than collage frames and hey – you can probably get them for free! You can buy some fun vintage ones, or blank ones, or you can opt to just keep the beer or soda logo on the back of ones you've collected from friends etc. I suppose you may be able to also paint over it. You can epoxy on a bail to make it stringable, or, before you pour in your resin, you can make a wire loop, bend it into the cap, and when the resin has cured, it will be secured. It is also possible to buy bottle caps with tiny holes already drilled for jewelry making.
Bezels: are unique metal findings that are like empty cups of all different shapes and sizes. I found that although they are pretty... they can cost and arm and a leg too. (ok... they aren't really all that bad... if you like 'em, try 'em out and let me know if they're worth it). I found a suggestion for making your own bezel out of a circle copper blank (already with a loop on the top) like you'd use for metal stamping. You basically put the blank in a concave form and gently hammer the blank into into it, until the blank is also concave. It's an interesting idea, which I plan to try... some day.
Other found objects: as with the molds, once you start looking for recyclable things to incorporate into your resin pendants and beads, you will find them everywhere. One great idea is to use old spoons of various sizes. Talk about unique!
Alright, so, you have your resin, and you have your base (mold or other) now what do you want to do with it? The possibilities are literally endless, but I will list a few here:
Color:
inks ( like alcohol inks)
concentrated color resin, translucent or opaque
oil paints (I read some vague blurb about this... must do more research)
resin compatible dye
mica pigments
Texture and cool-ness
embossing powder
micro beads
micro glass chips (which is actually what vintage glitter is made from – be careful though)
glitter ( you can try various weights – chunky, fine, ultra-fine etc)
Embellishments
metal findings
stuff in miniature (check out minikitz.com)
candy or food items
photographs, paper scraps
fabric
dried or fresh flowers etc
insects (though... that can be a little gross http://www.etsy.com/shop.php?user_id=5342282)
whatever odds and ends you find


 Posts
Posts