9:09 PM
Posted In
bead making
,
crafting
,
diamond glaze
,
embossing powder
,
game pieces
,
glossy accents
,
Pearl Ex Pigments
,
project
,
scrabble tiles
,
stamps
,
tutorial
,
upcycling
Edit This
crabble tile pendants certainly are all the rage at the moment, but there's no reason to settle for the typical cut and paste projects. This tutorial will walk you through using fun stamps, Pearl Ex Pigments and micro beads to create some one-of-a-kind pendants and charms of your own.
(A view of my chaotic work space at home:)
Ingredients:
- Scrabble tiles or similar (there are some scrabble tile look-a-likes out there)
- A variety of stamps - smaller stamps will fit the scrabble tiles, but remember that you can use just a part of a larger stamp for an interesting affect
- Ink pads in a variety of colors - I reccomend Staz On
- Pearl Ex Pigments
- Regular white glue (elmers or tacky)
- Diamond Glaze or Glossy Accents
- Modge Podge
- Micro Beads
- E-6000 and bail (unless you're going to drill your tiles)
Tools Of The Trade:
- Paintbrush
- Plastic pallet (for mizing pearl ex pigments)
- Safety Pin
- Waterproof, permanent pens - Faver-Castell India Ink pens or Sharpies work well
Process:
- Step One: Select your stamp. I am using some great small stamps I picked up at Michael's for $1. Ink your stamp.If you are using a stamp larger than the scrabble tile, ink a slightly larger area than you intend to use - it's pretty tough to get the stamp exactly where you want it on the tile. Stamp the image on the tile by laying the tile down on the stamp, not the other way around. Press down lighty, doing your best not to wiggle it around.
- Step Two: Try layering differnt stamps and different color inks. You can also use embossing powerder and a heat gun at this point if you'd like.
- Step Three: give the stamped images time to dry. If you are using an "imitation" scrabble tile, more than likely it has an unfinished surface and the ink will seep into the tile rather quickly. With an actual scrabble tile, the ink will sit on the surface and need more time to dry. Once they are dry, you can add punch to the stamped images using pearl ex pigments, mixed with a little bit of water and glue. Use them just like you would paint- mix colors, play around. I suggest using a small brush to apply the pigment to your tiles.
- Step Four: Again, allow everything to dry. At this point, you can add 3-dimensional stuff to your scrabble tiles. I recommend starting with micro beads because they're small, however, by all means, play around. If you are using micro beads, I would suggest:
- Coat the side of the scrabble tile you're working on with a thin layer of mod podge or slightly watered down glue.
- Place the micro beads about where you want them - it's going to be impossible to play them exactly in the right place on the first try. Using a pin, push the beads to where you want them to be. Allow the mod podge or glue to dry completely.
- TIP: No matter what - DONT leave the container open. I... I guess I really am a clutz, though I wish I could say I was just multi-tasking too much, but of course... I managed to spill them. All over my desk. It was a disaster. Good luck!
Step Four: Once you're happy and everything is dry you can seal the tile. Here is the crux. If you've used a waterbased ink, you're going to need to use a sealant that is NOT water based. Otherwise you're going to end up with a blurry mess. Finally add a coat of diamond glaze or glossy accents. If you're working with non-traditional scrabble tiles, you're going to want to coat every side of the tile. Wait for one side to dry completely before working on another side - I've learned this the hard way...
- Tips for applying Diamond Glaze: Use even pressure, working around the edges, then moving into the middle. If you happen to get a bubble, you're not really going to be able to pop it. Drag it out using a pin.
- Step Five: Now it's time to complete the pendant. I always allow my scrabble tiles to dry over night - that way there's no risk of mess ups - and as I am clutsy as it is, I don't need to do anything to add to the liklihood of my messing up. Using a small dab of E-6000, attach a bail and voila!
- Tips for working with E-6000: If you're sensitive to strong smells, make sure you have some ventilation. I'm pretty sure there are warnings for this... In any case, I try to work with small amounts and leave the room if I start to get a headache. I dab a bit of epoxy on a scrap piece of paper and use the tip of a safety pin to dot a tiny bit on the back of the bail - a lot goes a long way. Then I place the bail on the tile, center it, and use another safety pin or a toothpick to carefully swab away any excess epoxy. This takes some practice :)
C'est Fin!
3:22 PM
Posted In
bead making
,
crafting
,
embossing powder
,
Pearl Ex Pigments
,
stamps
,
technique
Edit This
While you may think embossing is for cardmaking and scrapbooking, it is actually a powerful tool to add to your bead making repertoire.
What's The Plan, Stan?
We're going to go over the basic technique of heat embossing. Try out your skills on one of the many projects and tutorials listed below. Come up with anything fantastic? Share it!
cagarp@plymouth.edu
Ingredients:
- Embossing powder (I suggest using clear, but there are a wide variety of colors available out there)
- Pearl Ex Pigments (optional)
- Ink (there are literally tons of kinds of inks out there. I recommend using Stayz On)
- Stamps (these can cost you lots and lots of money. I search through the $1 bins at Michaels, Dollar Stores and I make my own)
- Object to emboss on (such as a pre-drilled scrabble tile, or domino)
Tools Of The Trade:
- Heatgun (there are some good and some not so good heatguns out there. Having only worked with one, I'm not in a position to recommend a specific one. Check out different websites and read the reviews)
Process:
- Clean the surface of the object you are going to emboss on. (EX: if you're making a domino pendant, wipe it down with rubbing alcohol)
- Ink your chosen stamp (don't use too much ink, especially on a non-porous object. Try blotting your stamp on a tissue etc before stamping it.)
- Stamp your image! Lay the stamp down on a table and press the object on top of the stamp, rather than the other way around. This way the image will be placed exactly where you want it.
- Sprinkle with embossing powder over a piece of scrap paper. Tap your object to get off extra powder, and sift back into container.
- Heat the ink/embossing powder - - don't hold the heatgun too close so it doesn't actually burn it :) You'll see powder transform into bubbles and voila!
A note about Inks:
- Many of the projects bead artists will create use non-porous objects, such as dominoes, glass slides, etc. Regular dye-based inks, while still great on porous objects like scrabble tiles, won't stick on these surfaces. Also, if you intend to use alcohol inks with a stamped image, the alcohol will bread down dye-based inks and ruin your image. Remember these simple rules:
- If you're working on a porous surface, and not using alcohol inks - use regular ink.
- If you're working on a porous surface, and using alcohol inks - use "Stayz On" or "Metallic Inks"
- If you're working on a porous surface using alcohol inks and you want to create a resist image, use regular ink.
- If you're working on a nonporous surface, alcohol inks or not, use "Stayz On" or "Metallic Inks"
A note about Colored Embossing Powder:
- As I mentioned above, there are tons of beautiful colored embossing powders out there. However, why spend the extra cash (which many of us are so short on!) when you can make your own?
- Mix a small amount of Pearl Ex Pigment into your embossing powder and you have created your own unique color :)
C'est Fin!
Bead Artist Showcase
Have you made something beautiful using an embossing technique? Your work could be right here! Submit your stuff to Creativity In A Nutshell via email to cagarp@plymouth.edu. Feel free to include pictures, anything new you tried and suggestions you have for improvement.
More Similar Fun Stuff!
Go Buy Some!
Embossing Powder
Addicted to Rubber Stamps
11:42 AM
Posted In
bead making
,
game pieces
,
glossy accents
,
necklaces
,
Pearl Ex Pigments
,
pendants
,
project
,
scrabble tiles
Edit This
What is the draw of the Mona Lisa? The subtlety, the mystery. Create your own mysterious intrigue with this Mona Lisa inspired necklace.
What's The Plan, Stan?
We're going to use a scrabble tile to make a beautiful unique pendant for this vintage-like necklace
Ingredients:
- For Pendant:
- For Necklace:
- 34 wooden oval beads (dyed red)
- 16 3-4 mm faceted garnet rounds
- Four 6 mm onyx rounds
- 16 flat oval garnet beads
- One gold plated jump ring
- Two gold plated crimp beads
- One gold plated clasp
- Wire for stringing - I use fishing line, actually :)
Tools Of The Trade:
- For Pendant:
- Drill with small bit
- Scrap piece of wood
- Paintbrush
- For Necklace:
- Needlenose pliers
- Beading board (optional, but most helpful)
Process:
- Drill two holes in the scrabble tile - one on the top, one on the bottom
- Glue your image onto the tile. Let dry, and coat with another thin layer of glue. Re-pierce holes with a pushpin or safety pin.
- OPTIONAL: Add more detail with Pearl Ex Pigments and watered down glue. Allow to dry.
- Coat entire tile with glossy accents. Allow to dry completely.
- Place jump rings though both holes. Attach eyepin to bottom jump ring. Add first garnet, then onyx beats. Close with a loop.
- Bead Pattern for necklace:
- Wooden bead: Garnet Round: Wooden Bead: Garnet Oval:Wooden Bead: Garnet Round:Wooden Bead : Onyx Round.
- Make sure to place your crimp beads between two garnet rounds, rather than right at the end of the necklace. This will prevent it from being worn too much and breaking. End one side with a jump ring and the other side with the clasp.
C'est Fin!
Bead Artist Showcase
You work could be right here! Submit your own Mystery Woman Necklace to Creativity In A Nutshell via email to cagarp@plymouth.edu. Feel free to include pictures, anything new you tried and suggestions you have for improvement.
More Similar Fun Stuff!
More Stuff on the Information Highway:
9:59 PM
Posted In
alcohol inks
,
bead making
,
earrings
,
embossing powder
,
game pieces
,
glossy accents
,
Pearl Ex Pigments
,
project
,
stamps
,
upcycling
Edit This
Do you remember those fun times, playing checkers when you were little? Or maybe you still play checkers! Either way, show off your checkers skill with these beautiful checkers earrings.
What's The Plan, Stan?
We are going to make some super fantabulous earrings, using plastic checkers pieces, not the old fashioned (but equally sweet wooden ones).
Ingredients:
- Two checkers pieces (For this project, I used the white ones, however, you can use the black ones for a totally different effect.)
- Alcohol Inks (One or two colors - I used Wild Plum and Stream)
- Alcohol Ink Blending Solution
- Alcohol Ink Applicator and felt rectangles
- Stayz On opaque white ink pad (NOTE: When embossing, and then coloring with alcohol inks, regular old ink pads simply won't work. For the vintage earrings, we used that technique to create a resist technique, which is cool, but not what we're going for in this project)
- Floral Stamp (I used a beautiful one I found in the Michael's $1 bin)
- Clear Embossing Powder
- Silver Pearl Ex Pigment
- Glossy Accents
Tools Of The Trade:
- Drill with small bit (NOTE: you won't want to use too small of a drill bit, as it is more likely to get stuck and or break on you. I've done this - please, learn from my mistake)
- Scrap piece of wood
- Heat Gun
- Trash bag (hopefully one devoted to art use)
Process:
- Drill your checkers pieces, close to the edge, but not too close :)
- Mix clear embossing powder with a pinch of silver Pearl Ex Pigment in your mixing tray (or baby food container top :)
- Cover your work surface with a trash bag : Prepare to Alcohol Ink! Apply your two alcohol ink colors to the felt and stamp away. Add the Blending Medium as you like. Let it dry, then do the opposite side, and the edges. Once you are happy, allow both checkers pieces to dry completely.
- Stamp one side of the chipboard with stayz on opaque white ink. Sprinkle with embossing powder/Pearl Ex Pigment on top of the stamped image and heat with your handy dandy heatgun.
- Allow to cool. At this point you can gently add more Alcohol Ink and or Pearl Ex Pigments. I left mine as is.
- Coat with Glossy Accents (or similar). Allow to dry completely
- Add jumprings and ear wires and voila!
C'est Fin!
Bead Artist Showcase
You work could be right here! Submit your own BLANK to Creativity In A Nutshell via email to cagarp@plymouth.edu. Feel free to include pictures, anything new you tried and suggestions you have for improvement.
More Similar Fun Stuff!
More Stuff on the Information Highway:
8:56 AM
Posted In
bead making
,
earrings
,
embossing powder
,
flowers
,
glossy accents
,
Pearl Ex Pigments
,
stamps
,
tutorial
Edit This
Jewelry and Bead Artists are constantly looking for new and unique ways to make their jewelry and beads. I, for one, find myself pacing the aisles or my local craft store, meditating over all kinds of plans of making wondrous creations with the strangest of supplies.
Recently, I strayed upon the idea of Chipboard Jewelry. Scrapbooking enthusiasts know chipboard is a dense cardboard, often printed with nifty designs. Coated with a sealant, chipboard provides a fantastic and lightweight canvas for any kind of bead, pendant or charm you can imagine.
What's The Plan, Stan?
As with
domino pendants, there are literally limitless options with Chipboard Jewelry. For this tutorial, I'm going to keep things simple. However, stay tuned for many more creative, fun projects, expanding upon this same idea.
Ingredients
- Chipboard Circles (I purchased some very inexpensive -$0.70- ones at Michaels)
- Silver Metallic Ink
- Clear Embossing powder
- Silver Pearl Ex Pigments
- Small mixing tray (I used the top of a clean baby food container)
- Acrylic paint/gesso
- Floating medium OR water and glue mixture
- Glossy Accents
- Two silver plated jumprings
- Two earwires
- Two beads OR Modified Clasps
- OPTIONAL: Pressed Flower , Fine Black Sharpie
Tools of the Trade
- Drill with extra fine bit
- Scrap piece of wood
- Heat gun
- Floral Stamp (I got a fantastic one at Michaels in their Dollar Bin! Woot!)
- Paint Brush
Process
- Drill each chipboard circle - you'll want to have the hole as close to the edge as possible without weakening the piece - using a scrap piece of wood underneath to protect your work surface.
- Prep the surface: coat both sides of chipboard with acrylic or gesso (or a mix of the two) If you get paint in the whole, that's fine, just poke a pushpin or unfolded paperclip through it and you're golden.
- Mix clear embossing powder with a pinch of silver Pearl Ex Pigment in your mixing tray (or baby food container top :)
- Stamp one side of the chipboard with silver metallic ink. Sprinkle with embossing powder/Pearl Ex Pigment on top of the stamped image and heat with your handy dandy heatgun.
- Once the chipboard has cooled entirely, you can either play around with the colors, using Pearl Ex Pigments or you can leave it as is.
- These earrings were left at this step
- To make these earrings: Gently go over the entire surface with Blue Russet Pearl Ex Pigment (it's actually an antique-like rusty red), which has been mixed with floating medium or water and glue. (Use a soft paintbrush for this, like a watercolor brush) Then, add a wee bit more pigment to your mixture and go over some of the details on the earrings - I covered the flowers and a few of the loopy lines - with a fine paint brush.
- Back side option: You could leave the back blank. OR you could get creative and personalize your earrings.
- To get this effect: Coat the backs with a layer of glue. Apply Misty Lavender, True Blue and Blue Russet. Allow to dry. Coat the back of your flower with glue, set and coat top with glue. Allow to dry. Add your own phrase to the edge of the chipboard. I wrote 'Made With Love'.
- Once everything is dry (and it's really important that it is before you move on!) Begin the Glossing! Apply Glossy Accents to both sides. MAKE SURE THE GLOSSY ACCENTS HAS DRIED COMPLETELY BEFORE TOUCHING IT! Ahem... otherwise you will royally screw it up. Trust Me.
- Once the glossy accents has dried, you have a few more options. You can attach a small jumpring and be done, or you can add an accent bead. Here are two examples of the latter design:
- For one pair of earrings I used one half of two silver plated clasps - I think they make sweet metal findings! For the other pair, I used an undyed howlite round (around 6mm I think), and a silver plated bead cap. Experiment with complimenting and contrasting accent beads and metal findings.
Fin!
Bead Artist Showcase
- Your work could be pictured right here! Submit your own completed Victorian Inspired Earrings to Creativity In A Nutshell via email at cagarp@plymouth.edu. Feel free to include plenty of pictures, new stuff you tried and any sweet new ideas or suggestions you may have :)
More Similar Fun Stuff
More Stuff on the Information Highway
http://artrix-playtime.blogspot.com/2008/04/chipboard-jewelry.html
11:15 AM
Posted In
alcohol inks
,
bead making
,
earrings
,
game pieces
,
Pearl Ex Pigments
,
project
,
scrabble tiles
,
stamps
Edit This
I am a huge fan of beautiful vintage prints, mixed with chic modern style. You can find this artistic influence all over the web - just take a peak at your favorite artsy blogs. Many of these prints make use of delicate florals, and from this, I have drawn my inspiration for this this project.
What's The Plan, Stan?
In this project, we're going to make relief-stamped images on scrabble tiles using a beautiful floral stamp for some fantabulous earrings.
Ingredients:
- Two wooden scrabble tiles (or similar)
- Alcohol inks (one or two colors)
- Alcohol ink blending solution
- Clear Embossing Powder
- Silver Pearl Ex Powder
- Glossy Accents
- Two ear wires, two eye pins
- Two beads, matching ink colors you're working with
Tools of the Trade
- Drill and small bit, small piece of wood
- Needlenose pliers
- Heatgun
Process
- Drill each scrabble tile in the top left corner
- Stamp the blank side of the scrabble tile with silver ink. Sprinkle with the mixed embossing powder/silver Pearl Ex Pigment. Heat with heat gun :D (I love this part!)
- Give it a minute to cool down. Splotch the embossed tile with one (or two) color alcohol ink. The ink will dissolve the embossed image, simultaneously creating a relief image, and floating the pearl ex pigment over the top in cool patterns.
- Add Alcohol Ink Blending Solution to lighten the color - dab with paper towel as necessary.
- Once you are satisfied, allow the tiles to dry completely.
- Coat each surface with Glossy Accents. Remember to let each side to dry completely. Drying time can differ widely, depending upon weather conditions. For example, it has been pretty hot when I've worked with Glossy Accents in the past, so it has dried much faster. Today, however, it's been frigid and rainy - so it's taken much, much longer to dry.
- Once the Glossy Accents has dried, attach a jump ring, then eye pin, with a matching bead. Attach your ear wires and TaDa!
Fin!
Bead Artist Showcase
- Your work could be pictured right here! Submit your own completed Victorian Inspired Earrings to Creativity In A Nutshell via email at cagarp@plymouth.edu. Feel free to include plenty of pictures, new stuff you tried and any sweet new ideas or suggestions you may have :)
More Similar Fun Stuff
More Stuff On The Information Highway
8:24 PM
Posted In
bead making
,
crafting
,
Pearl Ex Pigments
,
review
Edit This
"Begin doing what you want to do now. We are not living in eternity. We have only this moment, sparkling like a star in our hand - and melting like a snowflake..."
Sir Frances Bacon
Try expressing your own sparkle and luster in your beading creations with Pearl Ex Pigments

- What the Deuce IS It?
- Pearl Ex Pigments, made by Jaquard (who also make Lumiere Light Body Metallic Acrylic Paints) are color-concentrated powders with lovely bits of shimmery mica. That's all there is to 'em. And that's the beauty. You can mix them into anything, layer them on top of anything, and create some really fantastic designs while you're at it.
- According to the Jaquard Website, you can mix them into:
- Pearl Ex Varnish
- Gum arabic
- Oil paint
- Acrylic paint
- Gouache
- Varnish
- Clay
- Poly Clay
- Melted wax
- And almost any other medium out there :)
- Check out
http://www.jacquardproducts.com/products/pearlex/ for more information.
- The Good, Bad and Ugly
- Pros:
- They come in tons of beautiful colors (over 50)
- As noted, they are highly concentrated, so you really don't have to use all that much.
- You can create a wide variety of effects with them
- They're color fast
- They're light fast
- They're non-toxic
- They're acid free
- They won't tarnish
- And They're Beautiful!
- Cons
- They are pretty pricey
- You have to apply them with a medium that is going to hold them (as a binder)- so while you may make some kind of paste with just water, once the water evaporates, the pigment will just fall off.
- Some of the hues just won't look quite right on lighter backgrounds. Most watercolor artists will understand the importance of hue-contrasts and value-contrast, so really, that's to be expected. Try using all the colors on light and dark backgrounds to see what effect you like best.
- Verdict
- Pearl Ex Pigments are super fun, relatively easy to work with and will add sparkle and beautiful to any project.
- Try It Out!
- Go Get Some!
1:17 PM
Posted In
crafting
,
game pieces
,
Pearl Ex Pigments
,
pendants
,
scrabble tiles
,
tutorial
Edit This
There are literally tons of stuff to make recycled beads out of! Similar to domino pendants, Scrabble tiles are all the rage with pendants and charms. These step-by-step directions will lead you through the basics of the process, which you can add on to. Feel free to post links to your own scrabble tile work!
Ingredients:
- Scrabble tiles or similar
- NOTE: I have found that the trickiest part of this fantastic craze is getting your hands on the scrabble tiles themselves. Ultimately, it's my opinion that upcycling old tiles (raid yard sales, second-hand stores etc) is best, however, there are plenty of other options out there.
- Hasbro.com has 'em for just under $7 (I don't know about shipping costs)
- Michael's sells Scrabble Tile Look-a-likes for $4
- You can also find pre-drilled scrabble tiles on Etsy.com under supplies
- Picture or other image
- Tacky Glue
- Glossy Accents (or other glossy sealant, like Modge Podge)
- Pearl Ex Pigments
Tools of the Trade:
- Drill and small bit
- Scrap of wood
- Xacto knife or similar
- Thumbtack
- Paintbrush
- Pallet or other non-porous dish to mix on
Procedure:
- Step One: Make a template of a scrabble tile using a thin piece of cardboard and an xacto knife.
- Step Two: Take your chosen picture, and trace the template over the design you want on your pendant or charm. Cut this out, using either scissors or an xacto kife.
- Step Three: Mark your scrabble tile by first measuring a line down the middle. Then, make two dash marks three or four millimeters from the edge of each side.
- NOTE: If you are using imitation Scrabble Tiles, or the ones you're using are worn, you may want to lightly sand them, using a high grit sand paper.
- Step three: Drill two holes where you have marked.
- VARIATION: If you don't want to drill holes, feel free to use a bail instead. I've found that metal bails can be pretty expensive. I saw an example where someone used a scrap-booking brad.
- Step four: Coat the blank side of the scrabble tile with glue (via a small paintbrush and a tiny bit of water) Let the glue set and become tacky - this should not take long.
- Step Five: Set down the image, smoothing it out over the tile. Allow it to set for a few minutes. If there is excess hanging over the edge of the tile, place it face down on the scrap of wood and trim the edges with your xacto knife.
- Step Six: Gently pierce through the image with a small thumbtack.
- Step Seven: Coat the top of the tile with glue, lightly watered down, using a paintbrush. Allow to dry completely. You may wish to apply one or two additional coats. You may, alternatively, wish to use modge podge or a varnish rather than glue. This step will seal and protect your image.
- Step Eight: You may wish, at this point, to further enhance the image you have chosen. Use Pearl Ex Pigments, with watered down glue, like watercolor paints, to add further details. You may also add more layers of images in a collage-type style for added interest.
- Step Nine: Coat again with a thin layer of either watered down glue or varnish etc...
- Step Ten: Cover each surface of the tile with Glossy Accents (or other) allowing the surface to dry completely before turning.
- NOTE: If you're using a bail rather than drilling holes, you'll want to attach it at this point, using a strong epoxy. I recommend E6000
- At this point the pendant/charm is complete!
Check out these related blog posts:
http://artistic-elements.blogspot.com/2009/08/project-scrabble-tile-jewelry.html
http://artistic-elements.blogspot.com/2009/08/monday-madness-weekly-earring-project.html
A Side Note on Images:
I chose to use magazine pictures from the art&antiques magazine. However, if you are planning on selling your pendants or charms, you should create your own images, or use only non-copyrighted images. If you don't have photoshop to edit pictures for the correct size etc, try GIMP :
www.gimp.org
More Stuff on the Information Highway:
http://littleput.typepad.com/me/2008/02/how-to-make-a-s.html
This website has great stuff to print out and use on your scrabble tiles (or any other collage beads, charms, pendants)
Go Green - Scrabble Tile Charm Earrings
11:10 AM
Posted In
acrylic paint
,
earrings
,
jewelry
,
painting
,
Pearl Ex Pigments
,
project
Edit This
Wow! Last week went by in a blur.
Each week I'll post a new, fun earring project with step by step directions.
This week's earring project is Summer Flowers
Project "Ingredients":
- Two 1 1/2 inch wooden disks (you can get these at your local craft or building supply store)
- Tacky Glue (or similar)
- Glossy Accents
- Floral Scrapbook Paper
- Pearl Ex Pigments
- Metallic Acrylic Paint or Metallic Marker
Tools of the Trade:
- Scissors
- Small Paintbrush
- Pencil
- Plastic Pallet (or other non-porous surface)
- Drill and Small Drill Bit (May also want small clamp and scrap piece of wood)
Process:
- Step One : Drill small hole in the top of each wooden disk
- Step Two : Trace the wooden disks on the scrapbook paper (you will need two circles of paper for each disk - one for each side) Cut 'em out - try to make them as round as possible, but reconcile yourself to the fact that they won't be absolutely perfect, and that's part of the charm.
- Step Three : Using a brush and a wee bit of water, spread Tacky glue on one side of the disk. Lay the paper on the disk, and center it. Cover the paper with more glue. Use a thumb tack to pierce a small hole in the paper where you drilled a hole in the wood. Repeat on the second disk.
- Step Four : Let both wooden disks dry. Flip the disks and repeat the previous step on the back.

- Step Five : Set out the Pearl Ex Pigments, matching the colors already in the scrapbook paper. Mix some glue with a wee bit of water on your pallet, and mix in your pigment colors. Use like water color to add sparkle and added depth to the scrapbook paper. IMPORTANT: Make sure that any pigment you add, has glue mixed with it. If the pigment is applied with just water, when the water evaporates , the Pearl Ex pigments will just dust off. When you are happy with the over all affect, allow to dry completely.
- Step Six: Paint the edges of both disks with a metallic acrylic paint. I used Emerald by Jacquard Lumiere Acrylic Metalic Paint. Allow to dry
- Step Seven: Cover one side of each disk with Glossy Accents. - Don't cover the hole - Allow to dry. NOTE: The dry time will depend upon how thick you apply it. I generally give it a couple hours, or overnight to avoid smudging etc. Flip 'em over and coat the opposite side. I suggest also coating the edges.


- Step Eight : Put a large jump ring through each hole.
- Step Nine : Add an accent bead. Pick a color that matches one already in your beautiful, one-of-a-kind accent piece. Attach your ear wires and you're done!
Suggestions for more Projects:
- Try using different kinds of scrapbook paper. I love the florals, but there are so many other options out there. I also love a lot of Japanese Origami paper.
- Use different wooden shapes and sizes.
12:04 PM
Posted In
ice resin
,
icecube trays
,
Pearl Ex Pigments
,
project
,
resin
,
resin casting
Edit This
I found this fantastic resin casting idea from ResinObsession - a fun blog dedicated to casting resin (supplies and projects). For my first resin experiment, I decided to play with this idea.
http://blog.resinobsession.com/2009/06/how-to-make-resin-jewelry-with-swirly.html
(You can see on the Resin Obsession blog that this project actually came from another blogger, Monika Rose, and her blog is:
http://monikarosecrochets.blogspot.com/)
I got all my supplies in order, making sure to cover my work table, which, was a really good thing as I tend to make a mess and resin casting is no exception. As always, I opened the windows and turned on a fan.
So, the basic Ingredient List:
- Pearl Ex Pigments
- Casting Resin and necessary mixing supplies
- Molds (I used ice cube trays) and Mold Release (I used cooking spray)
- Toothpick or unfolded paper clip
- Extra cups to mix different pigments in
- Popsicle Sticks
- Heat Gun
- Gloves
- Any extra embellishments or inclusions (I used a seashell)
Basic Procedure:

- Mix your resin, following the directions. For Ice resin, it's a 1:1 ratio of resin to hardener. I used a recycled plastic baby food container to mix the resin and hardener together.
- TIP: Fold/mix together gently to prevent lots of little bubbles. I didn't pay attention to this and so I got... lots of little bubbles. For this project though, I kind of think it works.
- Using a dry popsicle stick, measure out tiny amounts of Pearl Ex Pigment into different cups. I used the lids of recycled plastic baby food containers.

- TIP: The fewer pigments you use, the more pronounced each color will be in the finished product.
- TIP: A little big goes a long way, baby. The amount I show in the picture was really too much for what I was doing. Mix up smaller batches - you can always make more.
- Pour a small amount of the clear resin into the mold. Then, using either a toothpick or the paper clip, swirl in a few drops of pigmented resin. Experiment with different amounts of color.
- TIP: Too much pigment, and the colored resin will sink in the clear resin.
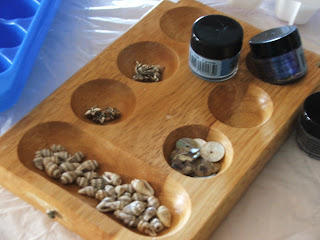
- You can add any extra embellishments you like. I organized all the embellishments I thought I might want to play with on the broken mancala board - I think it's quite handy. I decided to add a small seashell for this project.
- Once you are satisfied, let the resin begin the curing process in a warm, dry, non-dusty place. (Sorry about the blurry pic). You may want to put your molds under a clean cardboard box.
10:35 PM
Posted In
ice resin
,
icecube trays
,
jewelry
,
Pearl Ex Pigments
,
resin
,
resin casting
,
technique
Edit This
Resin beads and pendants are totally customizable and unique. The possibilities are really endless. You can play around with shape, with color, texture, size, design, embellishments and inclusions. It is virtually impossible to make two resin pendants alike.
To begin with, you need to choose what resin you want to work iwht. I anticipated numerous options, but as it turned out, my local Micahels didn't even sell resin and there are only a few jewelry supply sites that do. I have discovered these brands:
Ice Resin – a two part kit containing the resin and a hardener (think of this as like the developer in a hairdye kit – it's what makes it work)
Easy Cast – another 2 part kit
Resin De Solei – has aspecial compound that reacts with sunlight or ultraviolet light to cure more quickly
There's another resin out there (the brand escapes me) which you must purchase a separate catalyst for (kind of like the hardener in the Easy Cast and Ice Resin kits) I didn't want to fuss with the specific measurements.
I settled with an Ice Resin kit (with measuring cuts, stirrers etc from fusionbeads.com (Free shipping!)
The next step is to figure out what you're going to pour the resin into. You have two basic options: you can pour it into a mold (or some object that will act like a mold), or you can pour it into an object, which will become part of the pendant.
Molds: You already know I'm all into recycling, so, while you can purchase some great resin molds, or candy molds, you can also use some great every-day stuff to make your own molds. Hey, it's not only Green :) but FREE! Got a box of chocolates? Great! Use the tray to create fun small bead molds. Ate with some plastic spoons? - that's ok – wash and reuse them as molds. Once you start looking for objects, you'll find them everywhere.
An important note.... just like when baking, you're not going to get those chocolate-chip cookies off the sheet if you didn't grease it! Remember to spray the molds with either a release spray or cooking spray (I have ready that cooking spray works just as well, and is a whole lot cheaper).
Permanent Holders: These are the kinds of resin pendants most of us are used to seeing. They're often pretty shallow indentations, perfect for paper media embellishments.
Collage Frames: are fun and easy with a loop already on the top for stringing. All you have to do is add your fun stuff and pour the resin. The down side is (for me anyways) they're kind of pricey, at around $5 a pop. I found some plated ones at fusionbeads.com that were a bit more reasonable.
Bottle Capes: are recycled, generally deeper than collage frames and hey – you can probably get them for free! You can buy some fun vintage ones, or blank ones, or you can opt to just keep the beer or soda logo on the back of ones you've collected from friends etc. I suppose you may be able to also paint over it. You can epoxy on a bail to make it stringable, or, before you pour in your resin, you can make a wire loop, bend it into the cap, and when the resin has cured, it will be secured. It is also possible to buy bottle caps with tiny holes already drilled for jewelry making.
Bezels: are unique metal findings that are like empty cups of all different shapes and sizes. I found that although they are pretty... they can cost and arm and a leg too. (ok... they aren't really all that bad... if you like 'em, try 'em out and let me know if they're worth it). I found a suggestion for making your own bezel out of a circle copper blank (already with a loop on the top) like you'd use for metal stamping. You basically put the blank in a concave form and gently hammer the blank into into it, until the blank is also concave. It's an interesting idea, which I plan to try... some day.
Other found objects: as with the molds, once you start looking for recyclable things to incorporate into your resin pendants and beads, you will find them everywhere. One great idea is to use old spoons of various sizes. Talk about unique!
Alright, so, you have your resin, and you have your base (mold or other) now what do you want to do with it? The possibilities are literally endless, but I will list a few here:
Color:
inks ( like alcohol inks)
concentrated color resin, translucent or opaque
oil paints (I read some vague blurb about this... must do more research)
resin compatible dye
mica pigments
Texture and cool-ness
embossing powder
micro beads
micro glass chips (which is actually what vintage glitter is made from – be careful though)
glitter ( you can try various weights – chunky, fine, ultra-fine etc)
Embellishments
metal findings
stuff in miniature (check out minikitz.com)
candy or food items
photographs, paper scraps
fabric
dried or fresh flowers etc
insects (though... that can be a little gross http://www.etsy.com/shop.php?user_id=5342282)
whatever odds and ends you find


 Posts
Posts


